Tuesday, November 15, 2016

My Busy October

Hello my Stampin' Peeps!
How you been? I hope all is well. 

As you can see I was MIA for the month of October. Yes. October is a crazy month for me. Here are the main 2 reasons why. 

Reason #1.

My oldest Daughter had a birthday. The BIG 12!   

Reason #2

My very LAST baby also had a birthday. She turned 6. 

Why oh why do they have to grow up?! Will my heart ever stop hurting? I miss them being babies!

On the plus side I did however do some stampin! 

Here are some treats I made. 


I'm so in LOVE with this little skeleton dude! Seriously. 90% of the time when I play with the Cookie Cutter Halloween stamp set, I reach for him. He is just too cute!!  

Up next is this tag I made to go with this day of the dead lolipop. 


I also made these cute mini chocolate holders. 


Too cute right? This little treat is going out to my customers who place a order with me this month in November. 

Now that you know about my October I would love to hear from you. Leave me a comment below and let me know what you did. Did you do any stampin? Make any treats for the kids? Let me know! 

I hope you enjoyed this post. 

If you would like to order the Stampin' Up! Goodies used in this post please visit my online store. 

Happy Stampin',
Monica Mowry

Supplies:

Stamp Sets: Cookie Cutter Halloween, Spooky Fun, Mr. Funny Bones, Acorny Thank You
Tools: Cookie Cutter Builder Punch, 2" Circle Punch, Scalloped Tag Punch
Cardstock: Whisper White, Pumpkin Pie, Basic Black, Halloween Night Specialty Designer Series Paper
Other: Halloween Night Enamel Dots, Halloween Night Bakers Twine

Thursday, September 29, 2016

Inking Everything Facebook Hop

Hello my Stampin' Friends!

Today I would like to share with you the 2 projects I made for the Inking Everything Facebook Hop. Yes my friends I'm excited to say that I'm a part of this fabulous team!

First up is this Halloween Card. How cute is this little Mummy?
I used my aqua painter and some crumb cake ink to color him. I love how he came out!


 Here is a closer look at him.

Too cute!

You know I just hade to make another little mummy.

Here is my next project I made for the hop.


I made a little treat holder with my Big Shot and the Curvy Keepsakes Box Thinlits. Inside are those cute little ghost chocolates you see. So yummy!! 
 
I hope you liked my post today. Don't forget to go to my Facebook Page and start hopping!

To order the goodies used in todays post please visit my ONLINE STORE.

Till next time Happy Stampin' my friends!

~Monica Mowry


Supplies:

Stamp Sets:
Cookie Cutter Halloween
Gorgeous Grunge
Spooky Fun

Cardstock:
Pumpkin Pie
Basic Black
Very Vanilla
Whisper White
Halloween Night Specialty Designer Paper

Tools:
Cookie Cutter Builder Punch
Big Shot
Swirly Scribbles Thinlits Dies
Aqua Painter
Blender Pen
2 Inch Circle Punch
Handheld Stapler
Halloween Scenes Edgelits Dies
( By the way you can totally get this and the coordinating stamp set Spooky Fun in a bundle and save 10% WINNING)

Ink:
Basic Black
Pumpkin Pie
Crumb Cake
Basic Gray

Other:
Halloween Night Bakers Twine

Monday, September 12, 2016

Mr. Funny Bones

Hello my Stampin' Friends. Happy Monday!

Today I would like to share with you this card I made using the NEW Mr. Funny Bones photopolymer stamp set from the Holiday catalog. 


He is so cute! 

Here is what is included with the stamp set.  


Now don't worry. This stamp set is a photopolymer set, which means it's clear so you can easily see where your stamping. 

Speaking of stamping. I used white StazOn ink on basic black card stock to stamp my skeleton. I then used my paper snipes to fussy cut him out. I know, I know fussy cutting. To be honest it really was not bad at all. I promise. Go and give it a try. 

There you have it friends. I hope you enjoyed today's post. Before I go here are some new Special Offers from Stampin' Up. You have until Wednesday the 14th to order.

Also don't forget. For every $30 online order (before tax and shipping) you place with me on my online store you recieve a little thank you gift. Contact me today for more information. 

Hope you enjoy the rest of your day peeps! 

Happy Stampin'

~Monica

To order the new Halloween goodies used in today's post please visit my ONLINE STORE

Supplies:
Stamp Set: Mr. Funny Bones
Cardstock: Basic Black, Pumpkin Pie, Whisper White, Halloween Night Specialty Designer Series Paper
Ink: Basic Black, White StazOn 
Tools: Paper Snipes 

Tuesday, September 6, 2016

Halloween Mason Jar

Hello my Stampin' Friends!

Today I would like to share with you this mason jar filled with eyeball gum balls! Yummy.


I made the tag using the new stamp set Jar Of Haunts. This stamp set is featured in the new Holiday catalog. This set also coordinates with the Everyday Jars Framelits Dies. I also used the new stamp set Spooky Fun for the sentiment. 

This tag was really fun and EASY to make.  I used my aqua painter and some mint macaron ink to color "water". I used some Stampin Write Markers to color the eyes. I then just punched a little hole and ran some Halloween Night bakers twine through and tied around the mason jar lid and done! Super easy! 
This will make for a cute Halloween treat to give to a friend. 

One more thing before I go. During the month of September Stampin' Up will start having some special offers once a week. Here is what's on special this week till Thursday the 7th. 


Also I have my own September special going on. For every $30 or more order (before tax and shipping) you place with me through my online store you will receive a little Thank You gift from me. A little stamp with a basic black stampin spot.  


Each stamp will very but don't worry they're all cute! 

Thank you for stopping by peeps! 
Happy Stampin!

~Monica

To order the new Halloween goodies used in today's post please visit my ONLINE STORE

Supplies:
Stamp Sets: Jar Of Haunts, Spooky Fun
Cardstock: Whisper White, Pumpkin Pie
Tools: Big Shot, Everyday Jars Framelits Dies, Aqua Painter
Ink: Basic Black, Mint Macaron, Old Olive  & Mint Macaron Stampin Write Markers
Ribbon: Halloween Night Bakers Twine

Tuesday, August 23, 2016

Halloween Sneak Peek

Hello my Stampin Friends!

Today I just have to share with you this super cute Halloween goodie I made. I was going to post this tomorrow but I could not wait! 


This cute little skeleton is part of a new stamp set that will be available next week when the new Holiday Catalog goes live on September 1. 

 This little dude has a coordinating punch and SPOILER ALERT you will be able to use it not only for "Halloween" images but Christmas as well! I really can't wait to share with you the new holiday catalog!!

 Here is another view. 


These little skeleton candies are so cute! They go perfect with my little skeleton!! 

Just 9 more days peeps! 9 more days and you too can get your hands on this little skeleton! 

If you don't have a Stampin' Up demonstrator and would like a physical copy of the new holiday catalog please let me know! I would love to send one out to you! 

Thank you for stopping by.

Happy Stampin'!

~Monica


Monday, August 22, 2016

Thank You Card

Hello my Stampin Friends! Happy Monday! I hope you had a great weekend.

Today I would like to share with you this Thank You card I made. 


This card was inspired by one of the cards in the annual catalog just slightly different. One of the many reasons why I love the annual catalog. Not only does it showcase all the awesome goodies Stampin Up! has to offer but it's also filled with marvelous ideas which equals WINNING! 

I really like the color combo on this one and I love how the pearls give this card a little pop! 

Some of you may or may not know that I belong to the FAMOUS Inking Everything Family. Yes the one with my fabulous upline Becky Roberts. You know the stamper who makes those amazing paper purses. Well we have a birthday list and a couple of nice team members made me a birthday card. This thank you card is what I made them. Unfortunately one card did not have a return address. I'm hoping that she may stop by and see this card. Fingers crossed people!


One more thing I would like to mention. 
The new Holiday Catalog is almost here! I can't begin to tell you how AMAZING it is. I literally was like " Just take money already" as I was looking through it. I want it all and have a huge wish list. Yes us Stampin' Up demonstrators have wish lists too! Lucky for me I was able to order some new goodies Just one of the many perks of being a Stampin Up! demonstrator. I will be showcasing some stuff this week so check back soon! If you don't have a Stampin' Up! demonstrator and would like a copy please contact me. I would love to send one out to you. 


Thank You for stopping by. I hope you have a fabulous day, even though it's a Monday. We can do this peeps! 

Happy Stampin! 

~Monica 

To order the goodies used in today's card please visit my ONLINE STORE.

Supplies:

Stamp Set: Thoughtful Banners
Cardstock: Affectionately Yours Designer Series Paper, Crumb Cake, Flirty Flamingo
Tools: Duet Banner Punch, Big Shot, Floral Affection Textured Impressions Embossing Folders
Ink: Flirty Flamingo
Other: Affectionately Yours Washi Tape, Pearl Basic Jewels

Wednesday, August 3, 2016

Hello Card

Hello my Stampin' Friends!

Today I would like to share with you this card I made. 


This card was a spur of the moment kind of card. I had actually made the flower tag to use on something else I was working on. Only problem was I lost it. Yup somehow this tag got lost! I looked everywhere for it and no dice. It was gone. Fast forward to last night. I was cleaning up my work space and boom found it. So instead of cleaning I decided to play and made this card. Winning! 

Hope you enjoyed this post today. 

Till next time peeps!

~Monica

To purchase the goodies used to make this card please visit my ONLINE STORE.

Supplies:

Stamp Sets: Penned & Painted, Thoughtful Banners
Cardstock: Sweet Sugerplum, Whisper White, Playful Palette Designer Series Paper
Ink: Sweet Sugarplum, Emerald Envy
Tools: Scalloped Tag Topper
Embellishments: Sweet Sugarplum 3/8 Ruched Ribbon 

Saturday, July 30, 2016

Paper Pumpkin Thank You Cards

Hello My Stampin' Friends. Happy Saturday!

Today I would like to share with you some thank you cards I made for my new Paper Pumpkin Subscribers.

I was playing around with the new swirly scribbles thinlits and I saw that the big swirly die kind of looks like a pumpkin. So naturally I had to make a paper pumpkin card.


I added some wink of Stella to give it a little shine. So pretty!


Here is the other thank you card I made.

One of the many perks of being a Stampin' Up! demonstrator is being able to purchase this paper pumpkin stamp set. It debuted at convention (another perk for being a SU demonstrator) and I knew I had to have it. Its nice to have a paper pumpkin stamp to make thank you cards!

I just recently received a new member to my paper pumpkin family which I like to call my pumpkin patch. I sent her this Thank You Kit.

How cute is the paper pumpkin button? I was able to get 2 of these buttons.  I have one more button like this left. Would like a thank you kit like this? All you have to do is  join my paper pumpkin patch and subscribe to paper pumpkin. I would love for you to join!

I also have 2 of these Thank You kits as well.


There are 2 ways to subscribe.

The first way is a prepaid subscription.  You can try it for 1 month to see if you like it or there is a 3, 6 and 12 month subscription. With the 6 month subscription you save $1 per month and with the 12 month subscription you save $2 per month!


Or you can pay as you go with a montly subscription.  Either way there are some extra perks for subscribers.


To subscribe to paper pumpkin please visit my paper pumpkin page HERE or to order a prepaid subscription please visit my ONLINE STORE.


Thank You for stopping by peeps. I hope you are having a fabulous weekend!

Happy Stampin'!

~Monica


Tuesday, July 26, 2016

Minnie Thank You Card

Hello My Stampin' Friends!

Today I would like to share with you this thank you card I made for my neighbor/ friend. She LOVES Disney. She just went to the happiest place on earth and she was so sweet to think about me and my little family and brought us back a yummy Minnie caramel apple and some delicious Mickey and Minnie chocolate covered marshmallows!

Naturally I had to make a Disney theme thank you card!


I made this card using my FAVORITE tool the big shot and the new swirly scribbles thinlits dies.
I just used my paper snipes to snip off the little leaves.

I then brushed some wink of Stella over my swirls to give them a little shine.


The bow I made using the bow builder punch. I also used the new Sprinkles punch for the mini white dots for the bow. The stamp set I used was the Thoughtful Banners.

I think she will love it!

Thank you for stopping by my Stampin' Peeps!
Till next time.

Happy Stampin'!

~Monica

Don't forget friends, Bonus Days are going on right now. For every $50 you spend (before shipping and tax) till July 31 you get a $5.00 coupon to use in August. Visit my ONLINE STORE today!

Supplies:
Stamp Set: Thoughtful Banners
Tools: Big Shot, Swirly Scribbles Thinlits, Bow Bulider Punch, Sprinkles Punch
Ink: Basic Black, Wink Of Stella
Cardstock: Real Red, Whisper White, Basic Black

Monday, July 18, 2016

Going Away Card

Hello my Stampin' Friends!
Happy Monday!

Today I would like to share with you this going away card & goodie treat.
(I mean if you have to say goodbye might as well try and make it "sweet")


I finally played with my Swirly Bird stamp set. Winning!  How cute is the little sailboat? Which by the way was super easy to make. This stamp set is a photopolymer set which means the stamps are clear therefore easy to see where you stamp! Plus this set coordinates with the Swirly Scribbles thinlits! So many possibilities you can create with this set!   

Here is a solo picture of the card.


To make the waves I used the Swirly Scribbles thinlits and my most favorite tool the big shot. I "fussy cut" the sailboat with my trusty paper snips. The sentiment I used is from the Greatest Greetings stamp set. There's some good greetings in this set! 

Here is a solo picture of the goodie treat. 


For the tag I punched out a circle with whisper white cardstock and the 2 inch circle punch. Stamped and fussy cut another sailboat and added my waves. Very easy and fun!

Here is one more picture of them together. 


Now it's time for a fun fact. Did you know you can buy the Swirly Bird stamp set and the coordinating Swirly Scribbles Thinlits die in a bundle AND SAVE 10%?


Awesome right? 

Well I hope you enjoyed today's card and goodie treat. 

Don't forget about bonus days! For every $50 you spend now in July, you get a $5 off coupon to use in August. 

Till next time my Stampin' Peeps!

~Monica

To purchase the goodies used to make this card and treat please visit my ONLINE STORE

Supplies: Stamp Sets: Greatest Greetings, Swirly Bird
Tools: Swirly Scribbles Thinlits, Big Shot, 2 Inch Circle Punch, Paper Snips
Ink: Dapper Denim, Mint Macaron, Watermelon Wonder, Daffodil Delight
Cardstock: Whisper White Notecards, Whisper White, Night Of Navy
Other: 2x8 Cellophane Bag


Monday, July 11, 2016

Grateful For You

Hello my Stampin' Friends!

Today I would like to share with you this card I made for a friend of mine. 


I used the Acorny Thank You stamp set for the sentiment. I stamped it with Bermuda Bay then I used the Calypso Coral stampin write marker to color the little hearts.  The flowers were made with the big shot die cutting machine and the botanical builder framelits. 

I also filled a clear tiny treat box with Jordan Almonds. I added a flower on top to match the card. 


I'm loving the new clear tiny treat boxes! Have you used them yet?

Here they are together.


Hope you enjoyed today's goodies. 

Till next time peeps.

Happy Stampin'!

~Monica

To Order the goodies used to make this card and box please visit my ONLINE STORE

Don't forget peeps its Bonus Days. For every $50 you spend you get a $5 coupon to use in August. 

Supplies:
Stamp Set: Acorny Thank You
Tools: Big Shot, Botanical Builder Framelits
Cardstock: Soft Sky, Whisper White, Pink Pirouette, Calypso Coral, Pear Pizzazz, Daffodil Delight 
Ink: Bermuda Bay, Calypso Coral (Stampin Write Marker)
Embellishments: Pearl Basic Jewel, Clear Tiny Treat Boxes


Friday, July 8, 2016

You Are Remarkable

Hello My Stampin Friends!

Happy Friday!

Today I would like to share with you this lovely card or like my five year old says "the grapes" card.


I made this card using the Remarkable You stamp set. This set is becoming one of my favorites! I also punched out 16 flowers using the petite petals punch. For the center of the flowers I used the tree builder punch to punch out the little flower. I then added some pearls just to give it a little something extra. 

I notice I have been reaching for the pearls and rhinestones lately. They're becoming my "go to" for embellishments. Do you like to use the pearls or rhinestones? What is your "go to" for embellishments? Let me know in the comments. I would love to hear from you. 

Hope you have a great weekend.

Till next time peeps!

Happy Stampin'! 

~Monica 

To order the goodies used to make this card please visit my ONLINE STORE 

Supplies:
Stamp Set: Remarkable You
Tools: Petite Petals Punch, Tree Builder Punch, Paper Snips
Cardstock: Very Vanilla, Sweet Sugarplum, Playful Palette Designer Series Paper
Embellishments: Pearl Basic Jewels
Ink: StazOn Jet Black

Tuesday, July 5, 2016

Sending A Smile Your Way

Hello Stampin Peeps!

Today I would like to share with you this card I made using the Love & Affection stamp set.


I really like the crumb cake and night of navy color combo. The flower paper is from the Affectionately Yours designer series paper pack. I LOVE how it coordinates with the love & affection stamp set! Did you notice that the flowers on top of the sentiment matched the flower paper? I just stamped with night of navy ink onto crumb cake cardstock and "fussy cut" them.  

Here is a close up. 


I then just added some rhinestones to the center of each flower and to the bigger flowers on the flower paper to give this card a little "pop".

I hope you enjoyed today's card. Till next time peeps.

Happy Stampin'

~Monica 

Supplies:
Stamp Set: Love & Affection 
Cardstock: Affectionately Yours Specialty Designer Series Paper, Crumb Cake, Night Of Navy
Ink: Night Of Navy
Tools: 1 3/4 Circle Punch, Stampin Dimensionals
Accessories: Rhinestone Basic Jewels
To order the goodies used to make this card please visit my ONLINE STORE.

Friday, July 1, 2016

4th Of July Goodies

Hello My Stampin' Friends!

Today I would like to share with you some sweet goodies I made for the 4th Of July.

I found some really awesome patriotic candy at the grocery store, Once I saw them I knew they would be perfect for Stampin' Up's! NEW clear tiny treat boxes.  The first box has some yummy Rolo's inside. I used the thoughtful banners stamp set along with the coordinating classic label punch for the sentiment. I also used the smallest star die from the stars framelits set.


For this next box I filled it with some mini Ghirardelli chocolate squares and some Rolo's. I tied a bow around the box with some Dapper Denim ruched ribbon. To make the star tag I used the long solid bar stamp from the thoughtful banners stamp set. I alternated stamping with real red and pacific point. I then cut out the star shape using the second smallest star die from the stars framelits set. After I got my star I then layerd the smallest star on top and ran it through my big shot again. I tied around bow with some cherry cobbler bakers twine.


Here is a look at the top of the box / star tag.


This next goodie I used the new 2x8 cellophane bags. I put some York patties inside. I like how it came out. I just tied a bow and used a glue dot to attach to the top corner.


One last picture of all of them together.


Hope you have a great 4th of July weekend! Till next time peeps!

Happy Stampin'!

~Monica

Supplies:
Stamp Set: Thoughtful Banners
Cardstock: Whisper White, Real Red
Ink: Real Red, Pacific Point
Tools: Big Shot, Stars Framelits, Classic Label Punch
Accessories: Clear Tiny Treat Boxes, 2x8 Cellophane Bags, Dapper Denim Ruched Ribbon, Cherry Cobbler Bakers Twine, Rhineston Basic Jewels
To purchase items used to make these goodies please visit my ONLINE STORE

Wednesday, June 29, 2016

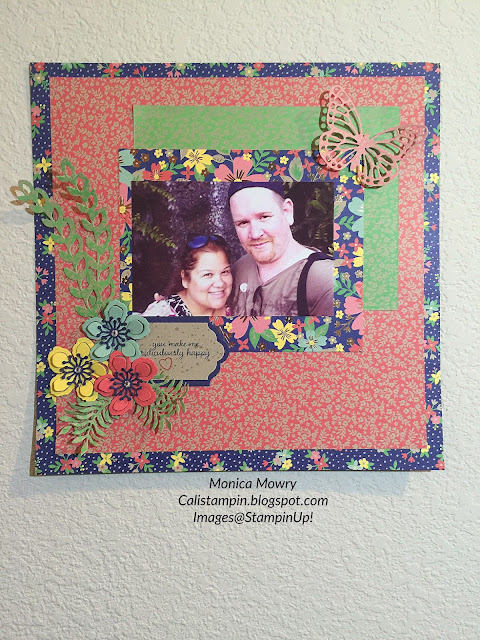
Affectinately Yours Layout

Hello My Stampin' Friends!

Today I would like to share with you this scrapbook layout.


Have you ever looked through pictures on your cell phone and find one that hits you right in the feels?  Well peeps this picture right here did exactly that. Hit me right in the feels. This picture of the hubby and I was taken at the Polynesian Cultural Center in Hawaii. This was our very FIRST trip that was just the two of us, no kids. It was like a honeymoon. It was wonderful. Of course when I saw it I had to document it.

I used the new affectionately yours specialty designer series paper. This paper is so gorgeous and it was PERFECT for this layout!

I also made some paper flowers using the botanical builder framelits. I liked how they came out.


I also used three different stamp sets. For the sentiment I used the new Love & Affection stamp set. I also used Gorgeous Grunge for the background and Bloomin Love Stamp set for the little heart.

I hope you enjoyed todays post.

Till next time peeps

Happy Stampin'

~Monica

Supplies:
Stamp Sets: Love & Affection, Gorgeous Grunge, Bloomin Love
Cardstock: Affectionately Yours Specialty Designer Series Paper, Night Of Navy, Crumb Cake, Watermelon Wonder, Daffodil Delight,  Mint Macaron
Ink: Night Of Navy, Watermelon Wonder, Crumb Cake
Tools: Big Shot, Lots Of Labels Framelits, Butterflies Thinlits, Botanical Builder Framelits
Embellishments: Rhinstone Basic Jewels

To purchase these goodies please visit my ONLINE STORE.


Sunday, June 26, 2016

The Case Of The Missing Blog Post!

Hello my Stampin friends! Happy Monday.


Well when you do read this it will be Monday =)

Today I would like to share with you some stuff I made for my upline Becky Roberts (Yes. The Becky Roberts from Inking Idaho) on the road event she held MONTHS AGO! Yes months ago. As I sit here and shake my head at myself for never posting, I still would like to share. Yes the stamp set and designer series paper are no longer available (Bubble Nuggets!) but no worries. As a added bonus to today's post and well it being Monday everyone's favorite day of the week.(Totally rolling my eyes here) I will be giving away the stamp set Party Wishes featured in today's post. Yes my friends leave me a comment. Which item you liked the most from this post. I will pick a winner on Friday (Fun Day). Just to clarify this stamp set is the one I purchased and USED to make these goodies. No need to worry I take good care of my stamps.


First up is this cake slice. Remember when I said this was one of my favorite dies? It was a MUST to make featuring the party wishes set. Hello Stampin peeps! Party = cake right?


Second is this scrapbook layout I made using a project life page layout. Pictures I used are from my Chloe girls 2nd birthday. (She is now 5. Where does the time go?)


Here is the back. 


Third we have this card that's also a gift card holder and candy holder. I wish I could remember who originally made this years ago. I like to give credit where it's do. If by any chance you reading this designed this, Thank You for sharing. You have inspired me to make one of my own.


Here is a closer look at the chocolates.


Up next is another project I made that was inspired by another SU demo. She just so happens to be part of the Artisan Design team. Thank you for the inspiration Joyce Fowler! 


Now we have this little mason jar filled with some yummy chocolate eggs.


Up next is this lovely treat holder
.


I really love how the stamped cupcakes came out! 


Okay last one for today. Here is a card I made. This design was featured in the occasions catalog. It was too cute to not replicate. 


There you have it my friends. Hope you enjoyed reading this picture heavy post. Don't forget to leave me a comment so you can be entered to win the party wishes stamp set! 


Till next time Happy Stampin'!
~Monica